Thursday, 16 December 2010
LONDON TRIP - THURSDAY 16th DECEMBER
Created with Admarket's flickrSLiDR.
9.00 Meet at the Cambridge Train Station
9.20 train to Kings Cross
10.10 Kings Cross
10.30 PART 1
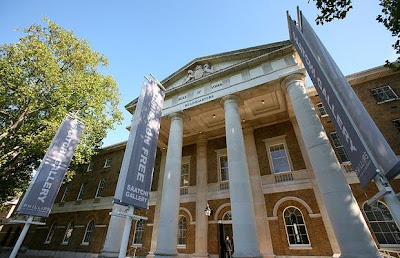
NEWSPEAK: BRITISH ART NOW PART 2
THE SAATCHI GALLERY
Duke of York's HQ
Kings Road
London SW3 4RY
http://www.saatchi-gallery.co.uk/
14.00 PART 2
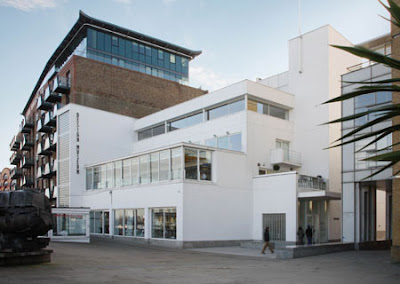
DESIGN MUSEUM
Shad Thames, London SE1 2YD
http://designmuseum.org/
1. DRAWING FASHION
- celebrates a unique collection of some of the most remarkable fashion illustrations from the twentieth and twenty first centuries.
http://designmuseum.org/exhibitions/2010/2010-drawing-fashion
2. PLAIN SPACE: JOHN PAWSON
"The father of modern architectural minimalism" - The New York Times http://designmuseum.org/exhibitions/2010/2010-john-pawson
Friday, 10 December 2010
POSTER SESSION 2: Film Poster Drafts
Wednesday, 8 December 2010
Monday, 6 December 2010
MEDIA PRE-PRODUCTION SESSIONS 12-14: SHOT LISTS
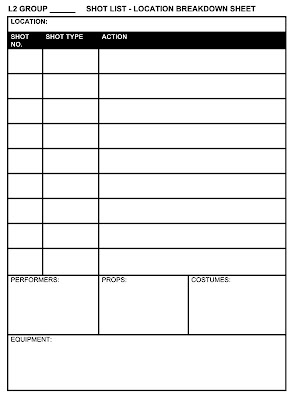
1. Create a SHOT LIST for each location.
2. Remember to add EXTRA cutaway shots if needed for extra coverage of the scene.
3. Create a PHOTOSHOP location IMAGE SHEET for each location.
- For locations at college, take the camera and take photographs.
- For locations outside college, use GOOGLE MAPS - use the virtual walk mode and take screen grabs [cmd - shift - 4].
4. Produce a Photoshop PROPS IMAGE SHEET for each scene.
- If you need to purchase a prop, research where would you find the cheapest price?
Friday, 3 December 2010
MEDIA PRE-PRODUCTION SESSIONS 9-11: STORYBOARDING
Thursday, 2 December 2010
MEDIA PRE-PRODUCTION SESSION 8: PRODUCTION TIMELINE
Wednesday, 1 December 2010
MEDIA PRE-PRODUCTION SESSION 6&7: 9 KEY FRAMES
SESSION TASK:
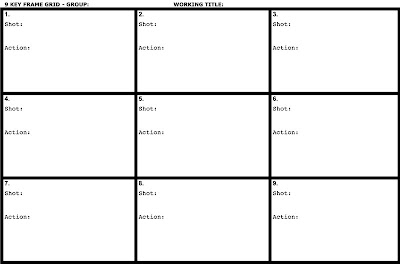
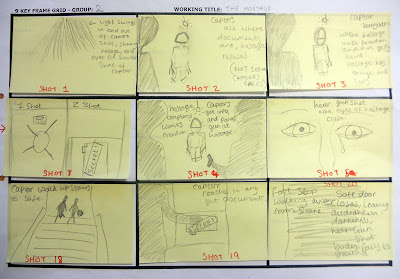
In your groups, create 9 KEY FRAMES for your end sequence.
- Each KEY FRAME should be drawn on a POST-IT.
- Stick the 9 POST-ITS on the A3 GRID SHEET.
- The key frames DO NOT have to be in a sequential order.
- Divide the task of drawing out the key frames between all members of the group. i.e. do not have just one person do all the drawing!
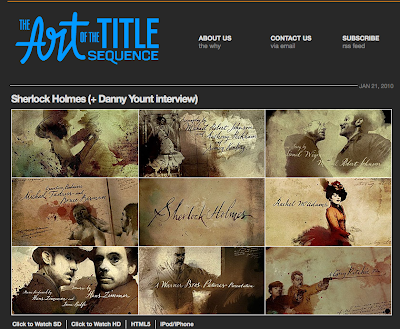
The ART OF THE TITLE website uses the 9 key frame grid to show the visual style of a film opening.
In your groups, create 9 KEY FRAMES for your end sequence.
- Each KEY FRAME should be drawn on a POST-IT.
- Stick the 9 POST-ITS on the A3 GRID SHEET.
- The key frames DO NOT have to be in a sequential order.
- Divide the task of drawing out the key frames between all members of the group. i.e. do not have just one person do all the drawing!
The ART OF THE TITLE website uses the 9 key frame grid to show the visual style of a film opening.
FINISHED MOODBOARDS
Created with Admarket's flickrSLiDR.
1. KRISTIE
3. JACK
4. CRAIG
5. EDWARD
6. ASHLEIGH
7. TOM
8. JAMIE H
9. NICC
10. LEWIS
11. BEN
12. LEE
FLICKR ALBUM
Tuesday, 30 November 2010
MEDIA PRE-PRODUCTION SESSION 4&5: MOODBOARD & CREATIVE COMMONS
1. Produce a MOODBOARD from 20 IMAGES from the internet that illustrate visual ideas for your end sequence. Reference each image by recording it's URL ADDRESS on the IMAGE SHEET.
N.B. Your last 5 images have to be found on Flickr.
3. HIGHLIGHT on the image sheet the LEGAL CONDITIONS SYMBOLS that have been assigned to your chosen Flickr images.
3. Create the MOODBOARD in Photoshop:
New project > International Paper > A4 > 300 dpi (to print)
CREATIVE COMMONS & FLICKR
Creative Commons is a nonprofit corporation dedicated to making it easier for people to share and build upon the work of others, consistent with the rules of copyright.
They provide free licenses and other legal tools to mark creative work with the freedom the creator wants it to carry, so others can share, remix, use commercially, or any combination thereof.
DOUBLE-CLICK ON THE IMAGE TO ENLARGE
Monday, 29 November 2010
MEDIA PRE-PRODUCTION SESSION 3: WRITING A VIDEO PRODUCTION TREATMENT
SESSION 3 TASK:
Write a TREATMENT (Synopsis) for the end sequence of your action-thriller film.
A TREATMENT > SALES TOOL TO PROMOTE A FILM IDEA > SENT TO PRODUCERS
- Summarises the key events
- Conveys a clear sense of the proposed storyline
- A WHO, WHAT, WHEN & WHERE of the story
- Written in the present tense
- No dialogue
- Write the treatment in Word
- Try to write about three paragraphs (one side of text)
Friday, 26 November 2010
MEDIA PRE-PRODUCTION SESSION 1& 2: UNIT 2/3 MEDIA PRODUCTION TASK
Produce the closing two stages of an action-thriller film.
- You need to produce TWO sequences before the end credits.
- One of the sequences needs to have dialogue.
- Some part needs to be an action sequence.
- You need to consider what visual style the film will have.
GROUP 1: Tom, Jamie & Craig
GROUP 2: Ashleigh & Edward
GROUP 3: Jack, Ben & Lee
GROUP 4: Kristie, Lewis & Nicc
SESSION 1 & 2 TASK:
On the provided A3 sheet, map out the groups initial ideas for the end sequence.
Thursday, 25 November 2010
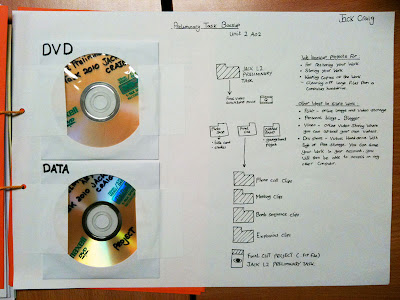
PRELIMINARY TASK BACKUP (UNIT 2 - AO2)
Reasons for backing up your project/work:
1. Keeping copies of your project/work.
2. Creates a portable version of your project/work.
3. Storing your project/work
(Clearing your hard drive of large files)
4. Protects your project/work
(For restoring damaged project/work)
Other ways to store your work:
1. VIMEO > video storage > full quality upload & download
2. FLICKR > photograph/image/artwork storage
3. PERSONAL BLOGS > internet research > images/video/links to websites/text & quotes
4. DivShare > 5GB free online storage area
Preliminary Task DVD
1. Open iDVD
2. Create a new project > save to the L2 folder
3. In the File menu > Select 'OneStep DVD from Movie'
4. Choose your finished QuickTime video
5. Insert blank DVD disc and burn
Monday, 15 November 2010
Friday, 12 November 2010
Wednesday, 10 November 2010
GARAGEBAND DEMO TRACKS
1. KRISTIE
2. JAMIE C
3. JACK
4. CRAIG
5. EDWARD
6. ASHLEIGH
7. TOM
8. JAMIE H
9. NICC
10. LEWIS
11. BEN
12. LEE
13. RHYS
2. JAMIE C
3. JACK
4. CRAIG
5. EDWARD
6. ASHLEIGH
7. TOM
8. JAMIE H
9. NICC
10. LEWIS
11. BEN
12. LEE
13. RHYS
Tuesday, 9 November 2010
PRELIMINARY TASK PHOTOS
FLICKR PHOTO SET 1: L2 PHONE CALL (PRELIMINARY TASK PART 1) 2010
FLICKR PHOTO SET 2: L2 THE MEETING (PRELIMINARY TASK PART 2) 2010
FLICKR PHOTO SET 3: L2 THE BOMB! (PRELIMINARY TASK PART 3) 2010
L2 THE MEETING (PRELIMINARY TASK PART 2) 2010
Monday, 8 November 2010
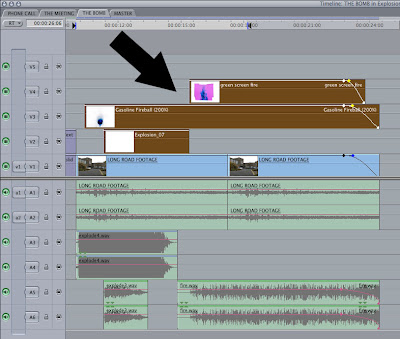
GREEN SCREEN & COLOUR KEY EFFECTS
N.B. Make sure the green screen / colour key clips are placed on top of the footage that you want to apply the effect on.
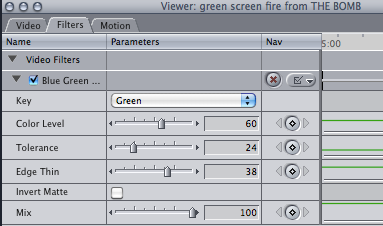
A. APPLYING THE GREEN SCREEN EFFECT:
1. MAIN MENU > VIDEO FILTERS > KEY > BLUE GREEN SCREEN
2. Double-click on the GREEN SCREEN CLIP in the TIMELINE
3. Select the FILTERS TAB in VIEWER WINDOW
4. Change the KEY to GREEN
5. Move the sliders to change the COLOUR, TOLERANCE & EDGE THIN settings to generate the transparency effect.
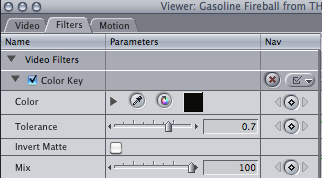
B. APPLYING THE COLOUR KEY EFFECT:
1. MAIN MENU > VIDEO FILTERS > KEY > COLOR KEY
2. Double-click on the COLOUR KEY CLIP in the TIMELINE
3. Select the FILTERS TAB in VIEWER WINDOW
4. Select the COLOUR you want to make transparent.
5. Move the TOLERANCE slider to generate the transparency effect.
Wednesday, 3 November 2010
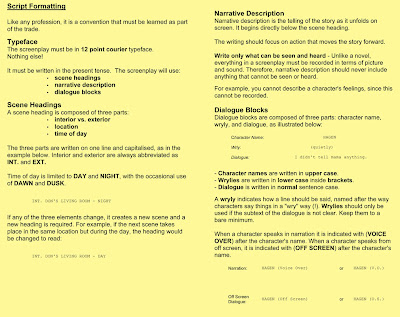
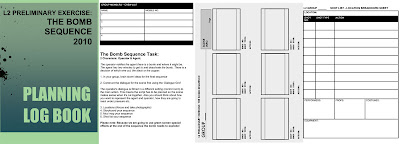
The Bomb Sequence Task
2 Characters: Operator & Agent:
The operator notifies the agent there is a bomb and where it might be. The agent has two minutes to get to and deactivate the bomb. There is a decision of which wire cut, the black or the copper.
1. In your group, brain storm ideas for the final sequence
2. Construct the dialogue for the scene first using the ‘Dialogue Grid’
The operator's dialogue is filmed in a different setting (control room) to the main action. This means the script has to be planned so the scene makes sense when it's cut together. Also you should think about how you want to represent the agent and operator, how they are going to react under pressure etc.
3. Locations (Recce and take photographs)
4. Storyboard your sequence
5. Mud map your sequence
6. Shot list your sequence
Please note: Because we are going to use green screen special effects at the end of the sequence the bomb needs to explode!
Tuesday, 2 November 2010
Sunday, 31 October 2010
TASK 2: THE MEETING EDITING
PLEASE NOTE THAT ALL GROUP FOOTAGE HAS BEEN UPLOADED (THIS INCLUDES GROUP 2 - ED, ASHLEIGH & JAMIE C - WHO FINISHED AT THE END OF THE FILMING SESSION)
1. OPEN THE L2 PHONE CALL PROJECT
(WE ARE CONSTRUCTING THE THREE PART VIDEO WITHIN THE FIRST FINAL CUT PROJECT)
L2 > L2 PHONE CALL G(1/2/3/4) > L2 PHONE CALL G(1/2/3/4).fcp
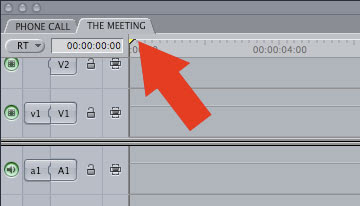
2. SELECT 'THE MEETING' TAB > THIS IS WHERE YOU WILL EDIT THE MEETING SEQUENCE.
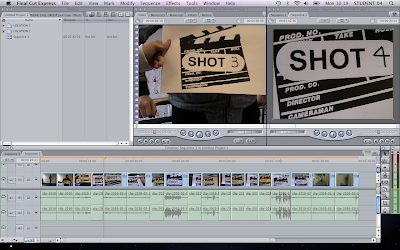
3. RENAME YOUR CLIPS SHOT 1 TO SHOT 12
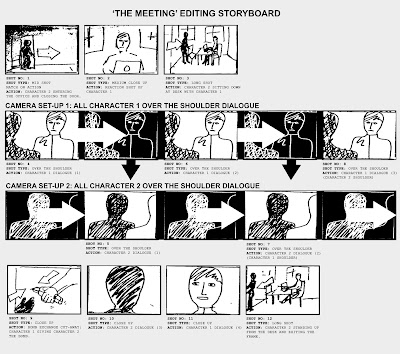
4. USING THE EDITING STORYBOARD BELOW, EDIT THE MEETING SEQUENCE.
PLEASE NOTE THAT THE TWO DIALOGUE 'OVER THE SHOULDER' SHOTS (SHOTS 4-8) WITH THE TWO CHARACTERS HAVE TO BE EDITED TOGETHER AS BELOW TO FORM THE MAIN DIALOGUE FOR THE MEETING SEQUENCE.
CLICK ON THE IMAGE BELOW TO ENLARGE
1. OPEN THE L2 PHONE CALL PROJECT
(WE ARE CONSTRUCTING THE THREE PART VIDEO WITHIN THE FIRST FINAL CUT PROJECT)
3. RENAME YOUR CLIPS SHOT 1 TO SHOT 12
PLEASE NOTE THAT THE TWO DIALOGUE 'OVER THE SHOULDER' SHOTS (SHOTS 4-8) WITH THE TWO CHARACTERS HAVE TO BE EDITED TOGETHER AS BELOW TO FORM THE MAIN DIALOGUE FOR THE MEETING SEQUENCE.
CLICK ON THE IMAGE BELOW TO ENLARGE
TASK 2: THE MEETING FILMING SESSION
Shoot the sequence in the shot order below:
LOCATION: OFFICE (G19) | ||
1 | MATCH ON ACTION SHOT | CHARACTER 2 – OPENING DOOR & ENTERING THE OFFICE TO SEE CHARACTER 1 |
2 | MEDIUM CLOSE UP | CHARACTER 1 – REACTION SHOT |
3 | LONG SHOT | CHARACTER 2 – SITTING DOWN AT THE DESK WITH CHARACTER 1 |
12 | LONG SHOT | CHARACTER 2 – STANDING UP FROM THE DESK AND LEAVING THE FRAME |
4/6/8 | OVER THE SHOULDER | CHARACTER 1 – CONVERSATION: BOMB MISSION & HANDOVER |
11 | CLOSE UP | CHARACTER 1 – CONVERSATION: BOMB MISSION & HANDOVER – KEY DIALOGUE |
5/7 | OVER THE SHOULDER | CHARACTER 2 – CONVERSATION: |
10 | CLOSE UP | CHARACTER 2 – CONVERSATION: |
9 | CLOSE UP | BOMB EXCHANGE – CUT AWAY CHARACTER 1 GIVING CHARACTER 2 THE BOMB |
Sunday, 24 October 2010
Saturday, 23 October 2010
Wednesday, 20 October 2010
TASK 2: THE MEETING PLANNING SESSION
CLICK ON THE IMAGE TO ENLARGE
1. Draw the STORYBOARD for the 'The Meeting' sequence.
2. Draw the 'MUD MAP' for the 'The Meeting' next to the SHOT LIST.
3. In groups, using the CONVERSATION GRID create the dialogue for the 'The Meeting' sequence.
4. What is 'MATCH ON ACTION' editing?
5. What is the 180 DEGREE RULE?
Tuesday, 19 October 2010
PHONE CALL TASK 1: EDITING
1. After uploading your footage you will put the shots in the order below to create the conversation between the two characters.
- The edit order of shots for the sequence is:
1 > 2 > 3 > 9 > 4 > 10 > 5 > 11 > 12 > 6 > 13 > 7 > 14 > 8 > 15 > 16 > 17 > 18
KEY:
GREEN = LOCATION 1 / CHARACTER 1
ORANGE = LOCATION 2 / CHARACTER 2
PURPLE = G BLOCK CORRIDOR / CHARACTER 2
2. Take a screen-grab of your timeline (cmd-shift-3) and post the image on your personal blog.
3. Tidy up the edit so the conversation looks natural and taking place in the present.
- No transitions
- No titles
- No sound effects
4. Export to QuickTime and upload to VIMEO
Thursday, 14 October 2010
PHONE CALL TASK 1: FILMING
Created with Admarket's flickrSLiDR.
FLICKR PHOTO SET
PHONE CALL TASK 1: FILMING
- You will film a conversation between two characters in three different locations.
- CHARACTER 2 is delivering a bomb to CHARACTER 1 and must have a bag as a prop.
- Each group will follow the shooting grid exactly.
- Groups will film all eighteen shots in order (1-18).
- First film CHARACTER 1 in LOCATION 1 (SHOTS 1-9), then move to LOCATION 2 and film CHARACTER 2 (SHOTS 9-16). Then film the two shots (17 & 18) in the G BLOCK CORRIDOR.
N.B. Films are rarely shot in narrative sequence. The aim is always to shoot everything in a particular location before moving on to the next one.
Wednesday, 13 October 2010
Tuesday, 12 October 2010
L2 TARGET AUDIENCE MEMBER EXAMPLES
Created with Admarket's flickrSLiDR.
FLICKR ALBUM
1. KRISTIE
2. JAMIE C X
3. JACK
4. CRAIG
5. EDWARD
6. ASHLEIGH
7. TOM
8. JAMIE H
9. NICC
10. LEWIS
11. BEN
12. LEE
13. RHYS X
Friday, 8 October 2010
Thursday, 7 October 2010
TARGET AUDIENCE - PART 2
TASK 1:
Create a mind map/spider-diagram of what you think the target audience is likely to be for your MEDIA PRODUCT case study and what other media products they would consume: e.g. where they would shop, social activities, games, TV (channels, programmes) films, clothing, brands, music, websites?
CLICK ON IMAGE TO ENLARGE
TASK 2:
In PHOTOSHOP create an A4 canvas.
Using the image above (drag this onto your canvas) create a graphic of your target audience member.
Choose one of the figures and add images from the internet of what kinds of taste they might have - where they would shop, what music they would listen to, what their favourite television programme would be, what clothes they might wear etc.
Wednesday, 6 October 2010
TARGET AUDIENCE - PART 1
‘Audience’ is the people who watch, read, buy, listen to, or use a media product.
In marketing and advertising, a 'target audience' is the primary group of people that the MEDIA PRODUCT is aimed at appealing to.
Looking at the ‘target audience’ for a media product means looking at those people that its makers think will watch/buy/use it.
TASK 1
Go to www.findyourtribe.co.uk
Created for Channel 4 by research agencies Crowd DNA and Voodoo.
This site invites you to complete an interactive quiz, which asks you questions about your tastes on music, fashion, lifestyle, brand and media preferences; at the end defining which youth tribe you belong to.
Answer the questions.
Crowd DNA’s ongoing research for Channel 4 has identified 26 clear and tangible youth tribes:
1. Trendies
2. Hipsters
3. Craft Kids
4. Clubbers
5. PC World
6. Techies
7. Townies
8. Rahs
9. Chavs
10. Street Rats
11. Boy Racers
12. Sports Junkie
13. Blingers
14. Bhangra Muffins
15. Trackies
16. DIYers
17. Get Paid Crew
18. Smart Urban
19. Indie Kids
20. Skaters
21. Moshers
22. Grungers
23. Emos
24. Goths
25. Scene Kids
26. Indie Scenesters
TASK 2 - BLOG POST:
- Take a screen grab [cmd - shift - 4] of the result page.
- Post it on your personal BLOG along with the video [copy & paste the embed code]
- Write a paragraph on the outcome and whether you think this is an accurate REPRESENTATION of you as a consumer?
Subscribe to:
Posts (Atom)