Sunday, 30 January 2011
The ‘Snatch’ Effect Write-up
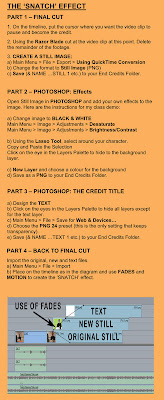
In WORD, using the ORANGE The ‘Snatch’ Effect A4 sheet, complete a written account of creating your end credits using the ‘Snatch’ effect.
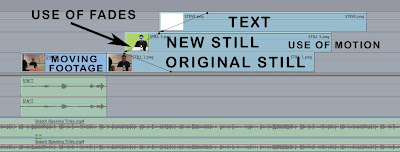
Illustrate the process using screen grabs from your Final Cut timeline and Photoshop project.
Make sure you describe how to achieve the ‘Snatch’ effect in detail using the correct terminology.
Divide the write-up into the FOUR parts as described in the guide:
PART 1 – CREATING THE STILL IMAGE IN FINAL CUT
PART 2 & 3 – PHOTOSHOP: EFFECTS & TEXT ON THE STILL IMAGE
PART 4 – CREATING THE EFFECT IN FINAL CUT
Friday, 28 January 2011
PROJECT OPENING TITLE
Thursday, 27 January 2011
The Credit Sequence / The ‘Snatch’ Effect
PART 1:
All groups will produce a 'Snatch' effect credits sequence for their end sequences using footage of their project's main characters.
PART 2:
Using the text generator in Final Cut all groups will then create closing credits of all the production roles:
Written by ……………
Production Design by ……………
Film Editing by ……………
Cinematography by ……………
Original Music by ……………
Directed by ……………
PART 3:
Lastly all groups will finish the credit sequence with:
A LONG ROAD MEDIA CERTIFICATE PRODUCTION 2011
CLICK ON THE IMAGE TO ENLARGE
Monday, 24 January 2011
Sunday, 23 January 2011
Friday, 21 January 2011
Monday, 17 January 2011
Friday, 14 January 2011
Monday, 10 January 2011
FILM PRODUCTION PLANNiNG
IMPORTANT: Each group MUST fill out a BOOKING FORM to have use of college equipment for their production.
IMPORTANT: Each group MUST fill out a HEALTH & SAFETY RISK ASSESSMENT GRID for each LOCATION of the production.
Filming Health & Safety Risk Assessment – Hazards Information Sheet
CLICK ON THE IMAGES TO ENLARGE
IMPORTANT: Each group MUST fill out a HEALTH & SAFETY RISK ASSESSMENT GRID for each LOCATION of the production.
Filming Health & Safety Risk Assessment – Hazards Information Sheet
CLICK ON THE IMAGES TO ENLARGE
Friday, 7 January 2011
MEDIA PRODUCTION SESSION 1
UNIT 3 - INTRODUCTION TO MEDIA PRODUCTION
For the next FOUR weeks you will be producing the 2 minute action-thriller end sequences you planned in UNIT 2.
The first week will be planning & filming leaving the second week for the editing of the project.
During this time each group will be expected to evidence the following:
1. Working title
2. Brief description of the product to be made
3. Roles assigned eg director, camera operator, editor etc.
4. Equipment booked eg video camera, still camera, tripod etc. [BOOKING FORMS]
5. Materials ordered eg props etc. [RECEIPTS]
6. Locations eg studio, office, outside location [RISK ASSESSMENT & RECCE]
7. Schedule activities [DATES & TIME]
8. Follow a production schedule & updating the schedule
9. Hold regular production meetings [MEETING MINUTES]
10. Consider relevant legal and ethical issues
11. Carry out a risk assessment or recce
12. Follow safe working practices
Thursday, 6 January 2011
Questionnaire Results
PART 1
In PAGES create bar/pie charts for the results for each of your questions.
Use the example above as a template.
Question 1 should have information of the numbers of students in your profile group (8 not including yourself) and who the group are, L2 students etc.
PART 2
When you have finished all the questions write a summary of your results:
Do the results differ from what you expected?
Which poster was seen to be most effective?
Would this be your choice?
Has there been suggestions on how to improve your poster design?
Was there any part of design that was seen not to work?
This summary should be about two paragraphs.
Wednesday, 5 January 2011
Tuesday, 4 January 2011
EXHIBITION CONTACT SHEET TASK
PART 1
1. Choose 12 photos from the ones you took at the Saatchi Gallery in London.
2. Place the images behind the contact sheet layer in Photoshop.
3. Create a unique backgroud design.
4. Add the Saatchi Gallery logo.
5. Add the show title: NEWSPEAK - BRITISH ART NOW (Part 2) - use the scanned exhibition catalogue cover.
6. Add artist/title/date/media information to the slides.
(Check the exhibition catalogue if you didn't make a note of the detail at the exhibition)
7. Upload finished jpeg to Flickr.
PART 2
Create a new post on your blog.
PARAGRAPH 1:
Information about the Saatchi Gallery in London.
i) What is the Saatchi Gallery. Where is it located?
ii) Who created the gallery and why?
iii) What kind of art does the gallery show?
[Use Wikipedia or the gallery website]
PARAGRAPH 2:
Write a short paragraph about the show you visited.
[NEWSPEAK - BRITISH ART PART 2]
PARAGRAPH 3:
Write about your images on your contact sheet:
TITLE / ARTIST / DATE / MEDIA
Why did you choose the artifact/artist?
Which photographs on the contact do you think are the most successful?
Explain why.
Saturday, 1 January 2011
John Pawson - Basic Space @ The Design Museum
22 September 2010 – 30 January
The Design Museum presents a major exhibition of the work of John Pawson. Often described as a 'minimalist' he is known for a rigorous process of reduction, that creates designs of simplicity, grace and visual clarity. At the heart of the exhibition is a site-specific 1:1 full-sized installation designed by Pawson to offer a direct experience of his work - the first such installation at the museum.
Plain Space celebrates Pawson's career to date with models, film, photographs and architectural elements and includes some of his most important projects including the Cistercian Monastery of Our Lady of Nový Dvůr in the Czech Republic, the Sackler Crossing at the Royal Botanic Gardens, Kew and the Calvin Klein store on Madison Avenue, New York.
See behind the scenes images, films and comment on the Plain Space Blog.
Subscribe to:
Posts (Atom)