Sunday, 31 October 2010

TASK 2: THE MEETING EDITING

PLEASE NOTE THAT ALL GROUP FOOTAGE HAS BEEN UPLOADED (THIS INCLUDES GROUP 2 - ED, ASHLEIGH & JAMIE C - WHO FINISHED AT THE END OF THE FILMING SESSION)

1. OPEN THE L2 PHONE CALL PROJECT
(WE ARE CONSTRUCTING THE THREE PART VIDEO WITHIN THE FIRST FINAL CUT PROJECT)

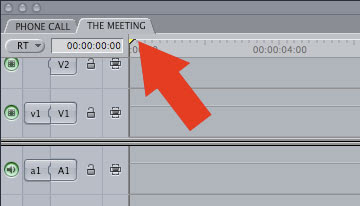
L2 > L2 PHONE CALL G(1/2/3/4) > L2 PHONE CALL G(1/2/3/4).fcp

2. SELECT 'THE MEETING' TAB > THIS IS WHERE YOU WILL EDIT THE MEETING SEQUENCE.


3. RENAME YOUR CLIPS SHOT 1 TO SHOT 12


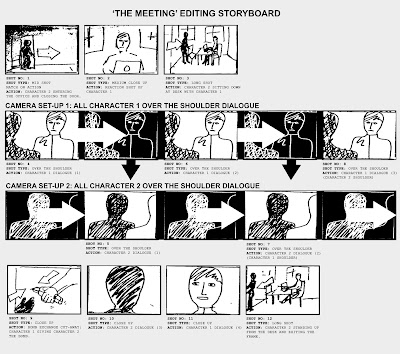
4. USING THE EDITING STORYBOARD BELOW, EDIT THE MEETING SEQUENCE.

PLEASE NOTE THAT THE TWO DIALOGUE 'OVER THE SHOULDER' SHOTS (SHOTS 4-8) WITH THE TWO CHARACTERS HAVE TO BE EDITED TOGETHER AS BELOW TO FORM THE MAIN DIALOGUE FOR THE MEETING SEQUENCE.


CLICK ON THE IMAGE BELOW TO ENLARGE
TASK 2: THE MEETING FILMING SESSION


Shoot the sequence in the shot order below:

LOCATION: OFFICE (G19)

1

MATCH ON ACTION SHOT

CHARACTER 2 – OPENING DOOR & ENTERING THE OFFICE TO SEE CHARACTER 1

2

MEDIUM CLOSE UP

CHARACTER 1 – REACTION SHOT

3

LONG SHOT

CHARACTER 2 – SITTING DOWN AT THE DESK WITH CHARACTER 1

12

LONG SHOT

CHARACTER 2 – STANDING UP FROM THE DESK AND LEAVING THE FRAME

4/6/8

OVER THE SHOULDER

CHARACTER 1 – CONVERSATION:

BOMB MISSION & HANDOVER

11

CLOSE UP

CHARACTER 1 – CONVERSATION:

BOMB MISSION & HANDOVER – KEY DIALOGUE

5/7

OVER THE SHOULDER

CHARACTER 2 – CONVERSATION:
EXCEPTING MISSION & TAKING THE BOMB

10

CLOSE UP

CHARACTER 2 – CONVERSATION:
EXCEPTING MISSION & TAKING THE BOMB
– KEY DIALOGUE

9

CLOSE UP

BOMB EXCHANGE – CUT AWAY

CHARACTER 1 GIVING CHARACTER 2 THE BOMB

Sunday, 24 October 2010

Saturday, 23 October 2010

Wednesday, 20 October 2010

TASK 2: THE MEETING PLANNING SESSION


CLICK ON THE IMAGE TO ENLARGE

1. Draw the STORYBOARD for the 'The Meeting' sequence.


2. Draw the 'MUD MAP' for the 'The Meeting' next to the SHOT LIST.

3. In groups, using the CONVERSATION GRID create the dialogue for the 'The Meeting' sequence.


4. What is 'MATCH ON ACTION' editing?

5. What is the 180 DEGREE RULE?

Tuesday, 19 October 2010

PHONE CALL (PRELIMINARY TASK 1) VIDEOS


VIMEO ALBUM

1. KRISTIE
2. JAMIE C
3. JACK
4. CRAIG
5. EDWARD
6. ASHLEIGH
7. TOM
8. JAMIE H
9. NICC
10. LEWIS
11. BEN
12. LEE
13. RHYS

PHONE CALL TASK 1: EDITING


1. After uploading your footage you will put the shots in the order below to create the conversation between the two characters.


- The edit order of shots for the sequence is:


1 >
2 > 3 > 9 > 4 > 10 > 5 > 11 > 12 > 6 > 13 > 7 > 14 > 8 > 15 > 16 > 17 > 18


KEY:
GREEN = LOCATION 1 / CHARACTER 1
ORANGE
= LOCATION 2 / CHARACTER 2
PURPLE
= G BLOCK CORRIDOR / CHARACTER 2

2. Take a screen-grab of your timeline (cmd-shift-3) and post the image on your personal blog.

3. Tidy up the edit so the conversation looks natural and taking place in the present.

- No transitions

- No titles

- No sound effects

4. Export to QuickTime and upload to VIMEO

Thursday, 14 October 2010

PHONE CALL TASK 1: FILMING


Created with Admarket's flickrSLiDR.

FLICKR PHOTO SET


PHONE CALL TASK 1: FILMING

- You will film a conversation between two characters in three different locations.


- CHARACTER 2 is delivering a bomb to CHARACTER 1 and must have a bag as a prop.


- Each group will follow the shooting grid exactly.


- Groups will film all eighteen shots in order (1-18).


- First film CHARACTER 1 in LOCATION 1 (SHOTS 1-9), then move to LOCATION 2 and film CHARACTER 2 (SHOTS 9-16). Then film the two shots (17 & 18) in the 
G BLOCK CORRIDOR.

N.B. Films are rarely shot in narrative sequence. The aim is always to shoot everything in a particular location before moving on to the next one.

Wednesday, 13 October 2010

FILM CASE STUDY SLIDESHOW GRID


CLICK ON THE IMAGE TO ENLARGE

Tuesday, 12 October 2010

Friday, 8 October 2010

L2 HORROR STILLS REPORT GUIDE


CLICK ON THE IMAGE TO ENLARGE

Thursday, 7 October 2010

TARGET AUDIENCE - PART 2


TASK 1:

Create a mind map/spider-diagram of what you think the target audience is likely to be for your MEDIA PRODUCT case study and what other media products they would consume: e.g. where they would shop, social activities, games, TV (channels, programmes) films, clothing, brands, music, websites?


CLICK ON IMAGE TO ENLARGE

TASK 2:

In PHOTOSHOP create an A4 canvas.
Using the image above (drag this onto your canvas) create a graphic of your target audience member.

Choose one of the figures and add images from the internet of what kinds of taste they might have - where they would shop, what music they would listen to, what their favourite television programme would be, what clothes they might wear etc.

Wednesday, 6 October 2010

TARGET AUDIENCE - PART 1


‘Audience’ is the people who watch, read, buy, listen to, or use a media product.


In marketing and advertising, a 'target audience' is the primary group of people that the MEDIA PRODUCT is aimed at appealing to.

Looking at the ‘target audience’ for a media product means looking at those people that its makers think will watch/buy/use it.


TASK 1

Go to www.findyourtribe.co.uk

Created for Channel 4 by research agencies Crowd DNA and Voodoo.


This site invites you to complete an interactive quiz, which asks you questions about your tastes on music, fashion, lifestyle, brand and media preferences; at the end defining which youth tribe you belong to.

Answer the questions.

Crowd DNA’s ongoing research for Channel 4 has identified 26 clear and tangible youth tribes:


1. Trendies

2. Hipsters

3. Craft Kids

4. Clubbers
5. PC World

6. Techies

7. Townies

8. Rahs

9. Chavs

10. Street Rats

11. Boy Racers

12. Sports Junkie

13. Blingers

14. Bhangra Muffins

15. Trackies
16. DIYers

17. Get Paid Crew

18. Smart Urban

19. Indie Kids

20. Skaters

21. Moshers

22. Grungers
23. Emos

24. Goths
25. Scene Kids

26. Indie Scenesters


TASK 2 - BLOG POST:

- Take a screen grab [cmd - shift - 4] of the result page.
- Post it on your personal BLOG along with the video [copy & paste the embed code]
- Write a paragraph on the outcome and whether
you think this is an accurate REPRESENTATION of you as a consumer?

Tuesday, 5 October 2010

Monday, 4 October 2010

HORROR STILLS TASK - PART 2


Photoshop > Final Cut

Stage 1:
Photoshop SFX > 10 STILLS + TITLE & END CREDITS
- adding blood
- creating zombies
- changing settings

Stage 2:
IMPORT YOUR IMAGE FOLDER INTO THE FINAL CUT PROJECT
- Choose soundtrack
- Edit your stills to the soundtrack
- Change the duration of the still to fit the soundtrack
- Add sound effects


UPLOAD QUICKTIME MOVIE TO VIMEO

Friday, 1 October 2010

HORROR STILLS TASK - PART 1


- In groups, go out with the stills camera and take 10 STILLS from an imaginary HORROR FILM.


- Members of your group will appear in the shots.


- The planned HORROR SEQUENCE has to be constructed from the 10 shot types below:


1. Establishing Shot

2. Close Up

3. Extreme Close Up

4. Mid Shot

5. Long Shot

6. Canted Shot

7. Point Of View (POV)

8. Over The Shoulder

9. High Angle

10. Low Angle


- You can use whatever props you can find, but make sure you return them and do not leave a mess!


(N.B. Photoshop will be used to add blood effects – you do not need to use ketchup!)

GROUPS SHOULD BE BACK IN 40 MINUTES TO UPLOAD STILLS